ArcGIS Toolbox Versions
User Guide
Download our user guide (.pdf) to read more about the ArcGIS Toolbox, its tools, and a set of tutorials.
Sample Data
Download and unzip our sample data folder if you would like to follow along the tutorials found inside the user guide. This data repository contains all the tables and spatial data necessary to run the set of telecoupling mapping and analysis tools we developed. For further information on any of the dataset provided, please feel free to contact us.
Prerequisites
To install the Telecoupling Toolbox for ArcGIS, make sure to follow all the steps specified below.
- R (3.2.0 or later)
- ArcGIS (10.3.1 or later)
- Python 2.7.x (ArcGIS comes with Python, so no need to install a standalone version of Python!)
Install Python libraries for 3rd party external software
The Telecoupling Toolbox for ArcGIS relies on a number of python libraries that are required to run tools that use external software (e.g. NatCap InVEST). If you skip this step, tools using any external software will NOT work.
- Although your computer may already have a C++ compiler installed, follow this step and Download and the Microsoft Visual C++ Compiler for Python 2.7
- Follow the instructions below depending on the version of ArcGIS installed on your system:
- ArcGIS 10.3.1 (standard 32-bit version):
- Download
get-pip.pyand save it on a local folder - Open the CMD prompt on Windows and type:
C:\Python27\ArcGIS10.3\python.exefollowed by the full path toget-pip.py(for example if you downloaded and saved the file on yourD:\drive, the full path would beD:\get-pip.py) - Hit Enter to run the command above
- Make sure
pipis installed and upgraded to latest version by running the commandC:\Python27\ArcGIS10.3\python.exe -m pip install -U pip - Download and unzip the PyLibs folder
- Inside the folder, double-click on the
ArcGIS103_Py32_libs.batfile - If you get errors that prevent installation of any of the required packages, please contact us with detailed information
- ArcGIS 10.4.x (standard 32-bit version):
- Open the CMD prompt on Windows and make sure the Python package manager
pipis installed and upgraded to latest version by running the commandC:\Python27\ArcGIS10.4\python.exe -m pip install -U pip - Download and unzip the PyLibs folder
- Inside the folder, double-click on the
ArcGIS104_Py32_libs.batfile - If you get errors that prevent installation of any of the required packages, please contact us with detailed information
- ArcGIS 10.5.x (standard 32-bit version):
- Open the CMD prompt on Windows and make sure the Python package manager
pipis installed and upgraded to latest version by running the commandC:\Python27\ArcGIS10.5\python.exe -m pip install -U pip - Download and unzip the PyLibs folder
- Inside the folder, double-click on the
ArcGIS105_Py32_libs.batfile - If you get errors that prevent installation of any of the required packages, please contact us with detailed information
- ArcGIS 10.6.x (standard 32-bit version):
- Open the CMD prompt on Windows and make sure the Python package manager
pipis installed and upgraded to latest version by running the commandC:\Python27\ArcGIS10.6\python.exe -m pip install -U pip - Download and unzip the PyLibs folder
- Inside the folder, double-click on the
ArcGIS106_Py32_libs.batfile - If you get errors that prevent installation of any of the required packages, please contact us with detailed information
Authorize Earth Engine with your Google Account
(this step is at the moment required ONLY if you intend to use the Food Security tool (Socioeconomic Analysis toolset)!)
If you would like to use the Food Security tool inside the Socioeconomic Analysis toolset, you need to make sure to complete a couple of steps first:
- Open the CMD prompt on Windows and type:
C:\Python27\ArcGIS10.X\Scripts\earthengine.exe authenticate, replacingArcGIS10.Xwith the main version of ArcGIS you are using (e.g. 10.3, 10.4, 10.5) - A web browser window should automatically open at this point. Select the Google Account you would like to use to authorize earth engine
- Copy the long code on the screen and paste it inside the CMD prompt that you had opened already. This should finish the authorization step and return a message like
Successfully saved authorization token - In the same CMD prompt, type
C:\Python27\ArcGIS10.X\python.exe -c "import ee; ee.Initialize()", replacingArcGIS10.Xwith the main version of ArcGIS you are using (e.g. 10.3, 10.4, 10.5)
Install the R-ArcGIS Bridge
(this step does NOT depend on the previous section and can be completed separately!)
In order to allow interaction between ArcGIS and the R software, you will need to follow the next few steps:
- Download and unzip the r-bridge-install-master folder
- Open ArcMap (NOTE: make sure you have admin rights on your computer or the next steps will not work!)
-
Find and open the Geoprocessing ArcToolbox window (Menu > Geoprocessing > ArcToolbox)

-
Right-click the ArcToolbox folder and select "Add Toolbox..."

-
Browse to the r-bridge-install-master folder and select the
R Integration.pyttoolbox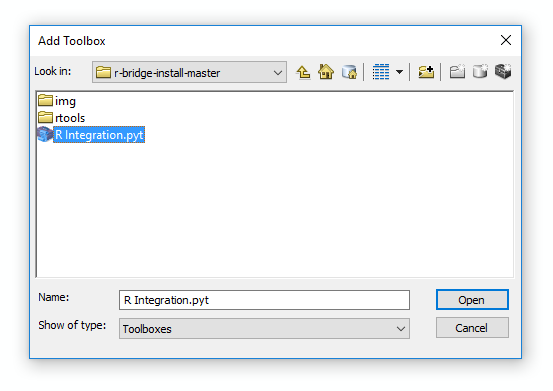
-
After the toolbox has been added to the ArcToolbox list, click on it to open it and double-click on the
Install R Bindingstool to open its interface. Click on OK to run it.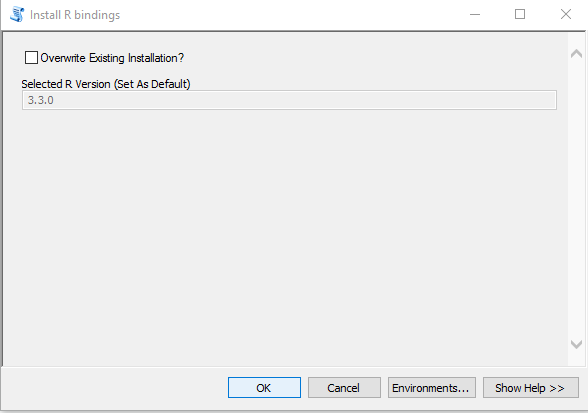
Add the Telecoupling Toolbox to ArcGIS
You are almost done! Now that you installed all Python 3rd party libraries and the R-ArcGIS Bridge, you are ready to use and test the Telecoupling Toolbox for ArcGIS.
Follow these steps to add the Toolbox to your ArcMap document:
-
Download and unzip the `Telecoupling Toolbox v2.3` folder.
NOTE: if you are using ArcGIS 10.3.1, instead download and unzip the Telecoupling Toolbox v2.3 folder for ArcGIS103 - Open ArcMap
- Right-click on the ArcToolbox folder and select "Add Toolbox"
- Browse to the unzipped ArcGIS Toolbox folder and select
Telecoupling Toolbox v2.3.tbx
Inside the Telecoupling Toolbox you should see 5 toolsets (agents, causes, environmental analysis, socioeconomic analysis, flows, systems) and a number of python tool scripts inside each one of them.
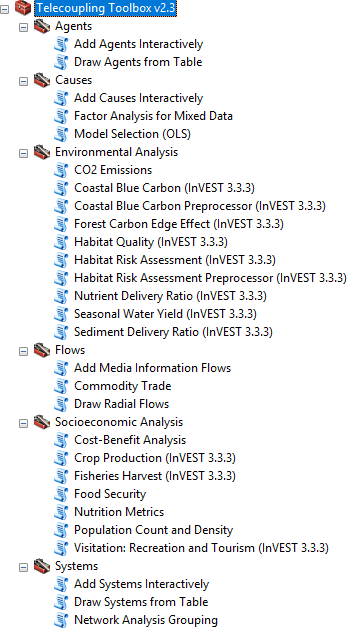
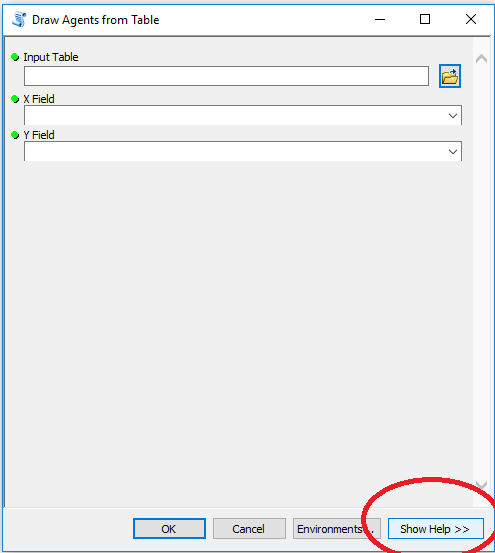
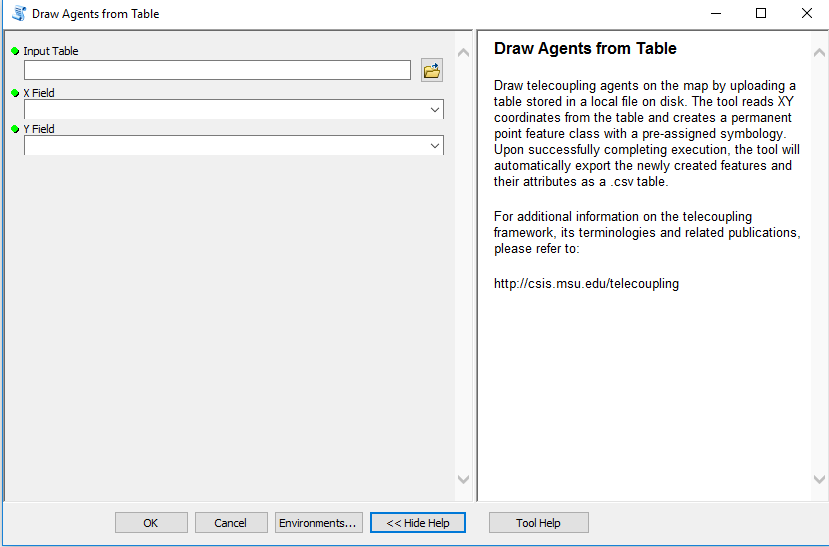
To learn more about what each tool script does and what parameters it takes, please refer to the User Guide. Alternatively, each tool will have a help window associated with it explaining what each parameter is and a general description of the tool. To open the help window, click on the 'show help' button found at the bottom of each tool script after opening it (double-click on the tool script to open the user interface).
That's it! The Telecoupling Toolbox is now added to the ArcToolbox list and you can start using it with the set of sample data.
